Save $1,000s in engine repairs by doing a clean, correct DIY oil change and disposing of used oil properly
Why This Matters (cost/safety/longevity payoff)
Regular oil changes are cheap insurance. Fresh engine oil maintains proper viscosity (how thick the oil is at a given temperature) so it can lubricate bearings, camshafts, and other moving parts without breaking down. Skip changes long enough and that oil turns into contaminated sludge, oil pressure can drop, wear accelerates, and you’re suddenly shopping for a major repair instead of a few supplies.
There’s also a real money angle: an oil change typically costs $20 to $55 (per Angie’s List, as cited in the source). Doing it yourself can keep more of that in your pocket—if you do it safely and correctly.
What You Need to Know (specs, types, intervals)
Before you buy anything, open your owner’s manual. Your manual is the only place that reliably tells you:
- How frequently you should change your oil
- How much oil you’ll need
- The kind of oil needed for your engine
Those three items vary by make/model/engine and aren’t safe to guess.
Tools and supplies (from the source)
Have this on hand before you start:
- Oil filter wrench
- Box end or socket wrench
- Large drain pan
- Funnel
- Latex or rubber gloves
- Ramps or jack stands (if needed)
Also plan on old rags for cleanup (the source specifically mentions cleaning with old rags).
Filter selection
You’ll also need the correct oil filter. The source’s guidance is simple and solid:
- Buy an oil filter that will last until your next oil change
- If you’re unsure, your local auto parts retailer can guide you to the right filter type
Pro Tip: If your vehicle uses a cartridge-style filter with a housing/cover, the source notes you may have two new gaskets—one for the cover and a smaller one for the Allen bolt. Don’t reuse old gaskets unless your replacement filter kit explicitly doesn’t include them.
How It Works (step-by-step you can follow)
Step 1: Check the owner’s manual first
This is not optional. Confirm:
- Oil change interval
- Oil capacity
- Oil type
Also confirm the filter style (spin-on vs. cartridge housing) so you bring home the right parts and tools.
Step 2: Elevate the vehicle (only if needed)
To access the undercarriage, the source recommends:
- Drive onto ramps, or
- Use a jack and jack stands to raise the car
Pro Tip: If you’re using a jack, don’t “trust the jack.” Set the vehicle securely on jack stands before you get underneath.
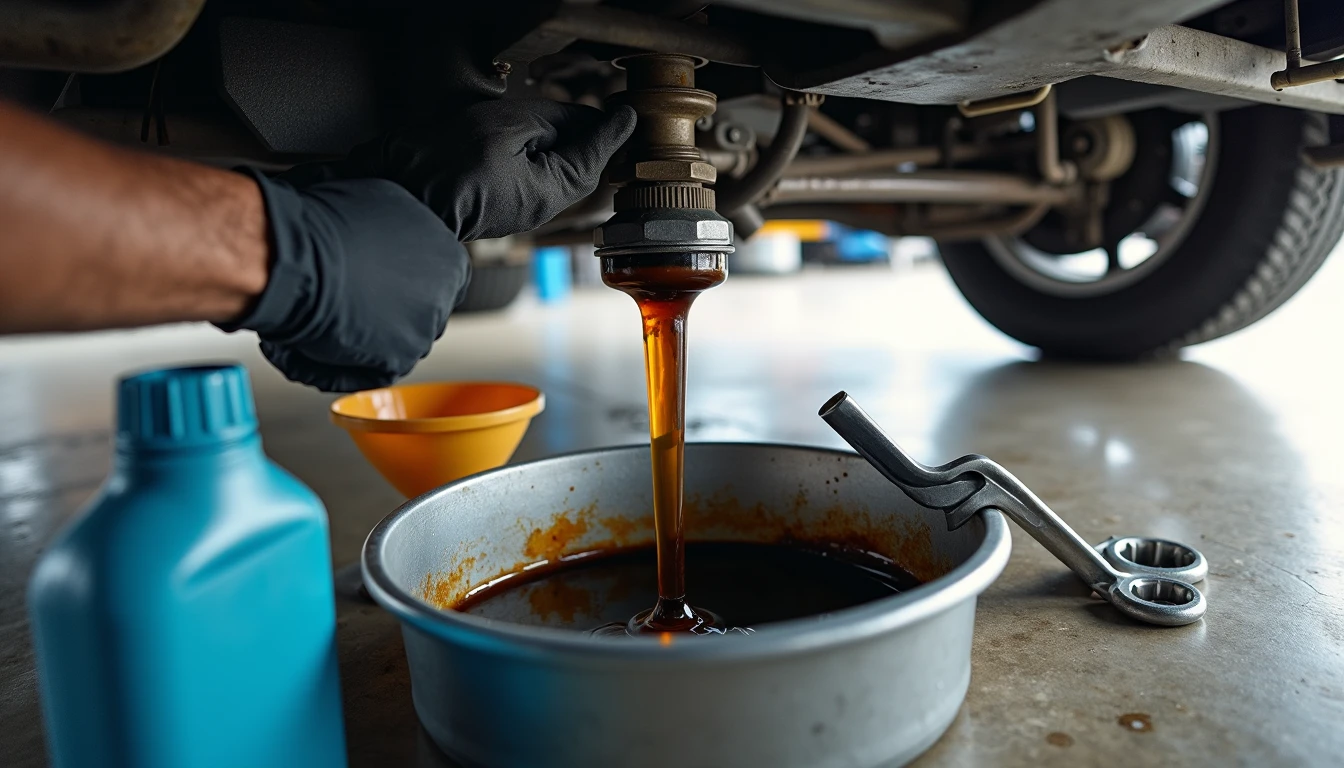
Step 3: Locate the drain plug and drain the old oil
You’re looking for the oil drain plug, which the source says is located:
- Underneath or on the side of the oil pan
- Usually at the bottom of the engine
Because some undertrays and multiple fasteners can confuse first-timers, the source stresses: consult your manual so you know which bolt it is.
Once identified:
1. Position your large drain pan under the drain plug.
2. Unscrew the drain plug with the appropriate box end or socket wrench.
3. Allow the oil to pour out completely into the pan.
Common-sense note: Used oil can be hot. Gloves help, but don’t put your forearm in the stream.
Step 4: Remove the oil filter (two common styles)
The source outlines two filter setups:
A) Spin-on style filter
1. Use a socket-style filter wrench to loosen the filter.
2. Turn the filter counterclockwise slowly.
3. Once it breaks loose, finish removing it by hand.
4. Dump the oil inside the filter into your drain pan and set the old filter aside.
B) Cartridge filter with a cover/housing
1. Look for the Allen bolt, usually located in the center of the cover.
2. Loosen it and drain any oil trapped in the chamber.
3. Use a band-style oil filter wrench to loosen the cover.
4. Remove the cover and then remove the old filter element.
Pro Tip: Keep the drain pan positioned under the filter area while loosening. Filters often spill as the gasket unseats.
Step 5: Prep and install the new filter correctly
1. Clean the filter mounting area with old rags.
2. Confirm no rubber from the old filter seal is stuck to the engine. (This is a big deal—double-gasketing can cause a major leak.)
3. Put on gloves. Dip a finger in fresh oil and moisten the new filter’s gasket (the rubber seal). The source says this helps the filter adhere better to the engine.
4. Install the new filter by turning it clockwise until you feel resistance.
5. Tighten it an additional about 3/4 of a turn—but no more than that (per the source). Over-tightening can damage the gasket or make future removal miserable.
If your filter uses a cover/housing, the source notes there may be two new gaskets: install the correct one on the cover and the smaller one on the Allen bolt.
Step 6: Reinstall the drain plug and refill with new oil
1. Reinstall the drain plug.
2. Tighten it using the box end of a combination wrench.
3. The source warns to be careful not to overtighten.
Then refill:
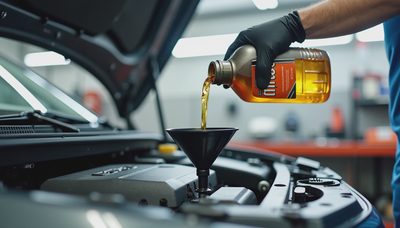
- Use a funnel to add new oil.
- The source emphasizes (again) that you must consult your manual for the correct oil type and quantity.
Pro Tip: Pour slowly. Fast pours can burp and splash, making a simple job messy.
Step 7: Dispose of used oil and the old filter responsibly
Used oil is hazardous waste. The source is clear:
- Take old oil and filters to recycling centers
- Never pour used oil down the drain
- Responsible disposal protects the environment and can help you avoid fines
Common Mistakes (myths, pitfalls, warnings)
- Guessing oil type or capacity. “Close enough” isn’t. The source specifically directs you to the owner’s manual for the kind and amount of oil.
- Removing the wrong bolt. Many pans/transmissions look similar underneath. The source warns to verify which bolt is the drain plug via the manual.
- Leaving the old filter gasket stuck to the engine. The source calls out checking for leftover rubber. If you stack a new gasket on top of an old one, the filter can blow out and dump oil.
- Overtightening the filter. The source’s “about 3/4 of a turn more” is there for a reason. Too tight can distort seals and complicate removal later.
- Overtightening the drain plug. The source warns against it. Stripping threads or damaging the oil pan can turn a routine oil change into a tow.
- Improper disposal. Despite what some people do, dumping oil is not just “bad”—it’s illegal in many places and environmentally damaging. Use a recycling center as the source instructs.
Bottom Line (summary, recommended action)
A DIY oil change is straightforward when you follow the sequence: confirm specs in the owner’s manual, safely raise the vehicle, drain the oil, swap the filter the right way, reinstall the drain plug without overtightening, refill to the manual’s spec, and recycle the waste oil and filter. Done right, it’s one of the best low-cost habits for keeping your engine healthy.